
This article is an excerpt from the Shortform book guide to "Personal Kanban" by Jim Benson and Tonianne DeMaria Barry. Shortform has the world's best summaries and analyses of books you should be reading.
Like this article? Sign up for a free trial here.
Do you know how to create a kanban board? How do you know what tasks are the most important to work on?
In Personal Kanban, Jim Benson and Tonianne DeMaria teach you the basics of personal kanban so you can create one yourself. They lay out the steps to get started on your personal organization journey.
Continue reading to learn how to develop your own kanban board.
Step 1: Choose Your Medium
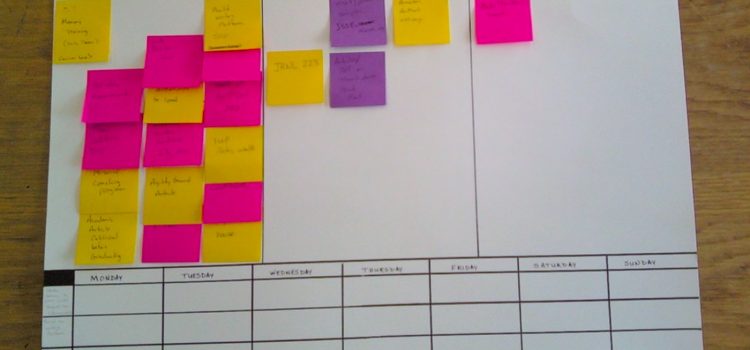
The authors’ advice for how to create a kanban board starts with the medium you work with. They say you can use any medium you’re comfortable with, like a notebook, computer, or the authors’ favorite: a whiteboard and sticky notes. Whatever you choose to work with, make sure it’s not permanent. The more you use personal kanban, the more you’ll understand how you work and how you can tweak your kanban to make it fit your work. The medium you use should allow you to make those tweaks without too much hassle.
Step 2: Set Up Your Ideal Value Stream
Your value stream refers to the stages your tasks usually go through as they progress from idea to accomplishment. The most basic version of this is Ready, Doing, Done. If your tasks require other steps, or if you want to get more specific, you can add more stages to your value stream. Once you know what your ideal value stream looks like, draw one column for each stage and label them. It should look something like this:
| Ready | Doing | Done |
Step 3: Get Your Tasks Out of Your Head
Now it’s time to populate your kanban with all the tasks you need to complete. This can feel overwhelming but getting every task out of your head and onto your kanban is the first step to getting organized. It means you no longer need to hold all that information in your mind, and you can start to prioritize, strategize, and get your tasks all the way to “done.”
Write down every task you can think of so they stop being background noise in your mind and start being actionable items. Benson and DeMaria recommend listing all your to-dos, whether they’re work or personal tasks. If you’re using sticky notes, make sure to only write one task on each note so you can easily visualize how many tasks you have to complete.
Step 4: Decide How Much You Can Work on at a Time
Now that you know exactly how much you need to do, you might be tempted to put everything in your “Ready” column and get to work. However, the authors warn that there’s a limit to how much work you can handle at a given time. If you overload yourself, you’ll create stress and become less efficient. Instead, limit the number of tasks you’re tackling at a given time and leave the other tasks in a backlog. This can be the edge of your whiteboard, for example, or you can add a column before “Ready” to house all the tasks you intend to complete.
You won’t know yet how much you can handle per day or week, so for now, just pick a number that feels realistic. As you use your personal kanban, you’ll start to notice how many tasks you can work on without getting overwhelmed, and you can adjust your limits accordingly. Also, the authors remind you that you’ll be more productive on some days than others and that some types of tasks are completed more easily than others. So you shouldn’t expect the number of tasks you’re able to tackle to remain static.
Make sure to leave some wiggle room for yourself between tasks. Keep in mind that setting a limit isn’t as simple as quantifying how much time you have. Having three hours available doesn’t mean you can complete three tasks that each last approximately one hour. They will technically fit into your schedule, but that won’t leave any time to rest, switch between tasks, or tie up loose ends if a task takes longer than anticipated. Instead, consider how many tasks you can complete without overwhelming or overextending yourself.
Step 5: Choose Your First Tasks
Now that you’ve set your task limit, choose the tasks you’ll work on and place them in the “Doing” column. These are the tasks you’ll work on today or this week. As you choose your tasks, take advantage of the freedom personal kanban gives you. Contrary to other situations where a task will be assigned to you by someone else, your personal kanban is a space where you can decide what to work on according to your priorities and what you feel comfortable tackling.
Benson and DeMaria have some suggestions on how to prioritize your tasks effectively. As with everything else in personal kanban, choose the approach that makes the most sense to you in your current situation:
Urgency and Importance
The authors derive inspiration from the time management matrix Stephen Covey presents in The 7 Habits of Highly Effective People. Covey’s matrix helps you differentiate between urgent and important tasks. Benson and DeMaria take Covey’s categories and make them more flexible to fit personal kanban:
| High importanceLow urgency Continuous improvement tasks | High importanceHigh urgency Urgencies |
| Low importanceLow urgency Rest and leisure | Low importanceHigh urgency Connection with others |
According to the authors, you should prioritize continuous improvement tasks. These tasks include learning and making projects more efficient. They’re not urgent, but they can help you avoid future emergencies. Urgencies, on the other hand, should be few and far between. Don’t get into the habit of putting tasks off until they become urgent.
Rest and leisure include the tasks you want to do. They might not directly contribute to your goals but they give your mind the rest and stimulation it needs to tackle the other quadrants. Finally, connection tasks include, for example, favors people ask of you and social gatherings that you feel obligated to attend. They’re urgent in the sense that they’re happening now, but they won’t necessarily move the needle for your current priorities. However, that event you attend tonight might help you strengthen connections that help you in a future project.
Presorting by Priority or Task Type
The authors suggest that you can also sort tasks by priority before choosing what to work on. To do so, you can add a series of columns between “Ready” and “Doing,” each labeled Priority 1, Priority 2, and so forth. Each priority column should have a limit to how many tasks it can hold, with fewer tasks allowed at higher priority levels. Then, as you pull tasks from Ready to Doing, they get filtered to those priority columns. By presorting the tasks, you make it easy to see which ones you’ve deemed most important. But because your prioritization doesn’t rely on set criteria like importance and urgency, you have more freedom to start where you want and reprioritize as needed.
Alternatively, if there’s a type of task you want to prioritize or make sure you don’t ignore, you can color-code them or use a special shape of sticky note to make them more noticeable.
Step 6: Observe, Learn, and Adjust
After a week or so of using your personal kanban, take a step back and reflect on what you’ve accomplished so you can continue improving. Continuous improvement is at the core of kanban, and the way you achieve it is by observing your work, asking questions, and trying out new ways of doing things.
Benson and DeMaria suggest three ways to embed continuous improvement into your Personal kanban practice: retrospectives, observing patterns, and metrics.

———End of Preview———
Like what you just read? Read the rest of the world's best book summary and analysis of Jim Benson and Tonianne DeMaria Barry's "Personal Kanban" at Shortform.
Here's what you'll find in our full Personal Kanban summary:
- Why life is too complex to organize with a to-do list or productivity system
- What a personal kanban is and how it's used by automakers and engineers
- How a visual board helps you see your workflow and make future plans


